On a recent Maccast episode I mentioned that I often will use the iMazing, imazing.com, app to manage and transfer Minecraft Pocket Edition maps onto or between my iOS devices without a jailbreak. After I made those comments many of you emailed to ask exactly how you do that. This is a quick how-to showing how I transfer levels between and iPhone and an iPad using iMazing. It also shows how to install a map download from minecraftmaps.com directly onto an iOS device using iMazing.
In OS X Lion Apple has added a new application (feature) called Launchpad. Basically it is a full screen application launcher reminicent of the Springboard launcher in iOS. After install Lion adds the Launchpad application to your Dock. On Macs with a built-in trackpad or Magic trackpad you can invoke Launchpad with a new 3-finger plus thumb pinch in gesture. I have a Macbook Pro and use it mainy as a desktop with an Apple Wireless Keyboard and a Magic Mouse. Since there isn’t a gesture for invoking Launchpad using a Magic Mouse I wanted an easier way to access Launchpad from my desktop setup. Lucikly it’s fairly simple to assign a keyboard shortcut to invoke Launchpad. I covered this tip in the latest Maccast, but in essence you do the following:
- Go into System Preferences–>Keyboard
- Click the Keyboard Shortcuts tab
- Select the ‘Launchpad & Dock’ category in the left colum
- In the right pane, check ON ‘Show Launchpad’ and double-click the area near where it lists the assigned shortcut keys (by default this is blank for Launchpad). That will make the area editable.
- Press the desired keyboard shortcut to assign it. (I assigned mine to the ‘F8’ key).
- Close the System Preferences
So this is what I did and it worked great. I was able to access Lunchpad just fine wth one tap of my F8 key and all was going great until this morning. I had been hearing reports of people having an issue where Launchpad application list was not being updated when installing new apps. I was fairly certian that I wasn’t having this issue, but I wanted to double check so I pressed my F8 key and… “Bonk!” I got the invalid key press system sound. I thought that maybe in my testing of Lion’s new Universal Access features I may have inadvertantly enabled something that was causing a conflict. I double checked my F-key settings and did all the standard keyboard troubleshooting, but couldn’t find anything wrong. I finally realized it was only Launchpad that wouldn’t respond to the assigned keyboard shortcut. I even tried assigning a completely different one, but to no avail. “Bonk!” was the only response it cared to give me. I was still able to open the Launchpad application from the Dock and even confimed that all the applications I had recently installed were in there. I wasn’t suffering from the issue I had been hearing about, but I had determined Launchpad was definately my culprit. I thought I should at least try the fix that had been reported for the other Launchpad issue and see what would happen. Long story short, it fixed my issue too.
Doing Launchpad Repair
It seems like Apple has some more tweaking to do with respect to Launchpad. In the meantime though, it appears there may be a universal perscription for general Launchpad issues. I found this information over on TUAW and it’s referenced from an original article by the folks over at HaiTeq. In those articles it specifically mentions this proceedure for fixing a Lunchpad that is missing newly installed applications. Since it also fixed my keyboard shortcut issue I decided to write it up here and share it for those who may have suffered a similar fate to mine. Here’s the proceedure.
- Launch Terminal (from /Applications/Utilities/Terminal).
- Navigate to the Application Support folder in question (cd ~/Library/Application\ Support/Dock)
- Open the folder (open .) and drag all the .db files to the trash.
- Restart Dock (sudo killall Dock, followed by authentication)
Small disclaimer. Launchpad is a new technology and mucking about with it’s core files could have unexpected results. Anytime you go messing around in the bowels of the OS there is potential for trouble. This fix seems to have worked for me, but your results might not be the same. You have been warned.
I’m sure more than a few of us have wanted to change this setting and not always been able to find it.
Hooking up the iphone opens iPhoto every time AGAIN, just like it used to be before people complained to apple until they fixed that. Unbelievable! Do you know a fix?
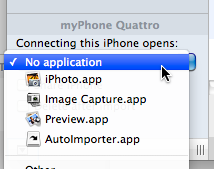
Did you get a new phone or rest your device? That setting is set per device and you need to set it using the Image Capture application (Applications–>Image Capture). With the phone connected launch Image Capture. You should see your iPhone listed in the ‘Devices’ at the top of left hand column. At the bottom of that same column you should see the Device Settings pane. If you don’t you may need to click the little ‘Show Device Settings’ icon (looks like a window with a triangle) to display the pane. At the top of that pane you can change the ‘Connecting this iPhone opens:’ setting to ‘No application’. You can also set it to launch an application other than iPhoto, say Image Capture or any other application you’d like by selecting the ‘Other…’ option. Once you have the preference set you can quit Image Capture and it should be set until you get a new device or restore your iPhone.
Update:
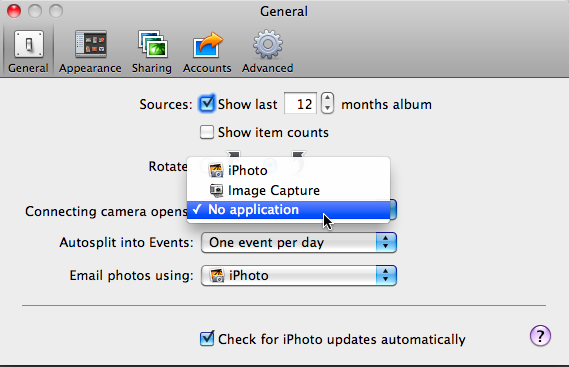
I should have checked iPhoto ’11 first. Before I get a bunch of email on this… You CAN also set this setting in iPhoto, at least the latest version. In iPhoto go to the iPhoto menu –> Preferences –> General and then adjust the ‘Connecting camera opens:’ setting to ‘No application’.
Hey Adam,
I’ve got a new Macbook Pro with OS X and Apps on a 128 Gb SSD in the SuperDrive bay. My data lives on a 1 TB HDD. Right now I have Time Machine backing up the 1TB drive (since OS and Apps are easily reinstalled and the SSD is more durable). The problem is that I need to put my MBP on my desk and plus in the Time Machine drive.
Is there a way to hook up the Time Machine to the USB port on my Airport Extreme and have the MBP connect to the shared drive automatically every time it connects to my WiFi and then have Time Machine back up? It would be sweet to just have the MBP backup automatically every time it’s in range of my WiFi.
Unfortunately that isn’t supported, http://docs.info.apple.com/article.html?path=Mac/10.6/en/15139.html
“Time Machine can’t back up to an external disk connected to an AirPort Extreme”
Apple’s only supported solution in the “Airport” line is the Time Capsule. I believe you may also connect a disk to another Mac and then use file sharing from System Preferences–>Sharing to make the disk available on the network. From there you would be able to mount the shared disk on your Macbook Pro and use Time Machine back up to it. As noted in the article liked to above, both machines need to be running 10.5.6 or later and must be using Apple File Protocol (AFP) file sharing.
There are ways to hack a solution together, but most report mixed results and it’s not supported by Apple. In my opinion you don’t want to have a backup system that could be less than reliable.
You know I get great questions from you everyday via email. Some of these I respond to on the show, but others I just answer via email. That’s great for the person asking the question, but what about the rest of us?
Welcome to the inaugural post of the “Maccast Question of the Day”. Today I respond to a question about the iPad and why it never quite seems to know exactly what time it is.
Roger asks:
I have noticed recently that the time settings on my iPad do not match with the time settings on my MacBook even though I have syncronized the two reqularly. Over a week or so the iPad can be off more than 20 minutes. I know the MacBook will adjust the system time with input from the Internet. Does the iPad have a similar capability? If so, where is the setting?
Funny you should mention this. It depends. Do you have a Wi-fi or 3G model? If you have the 3G model, just turn on the cellular data from Settings–>Cellular Data for a minute or so and it will update the time from the cellular network (this works even if you don’t have an active service contract). On the Wi-fi model, you have to adjust it manually. Apple needs to fix this, but until then we’re apparently SOL. The Mac Observer posted an excellent article about the issue and they recommend an App called Emerald Time (iTunes link) that can get an accurate time from an Internet time server. Unfortunately, while the App can give you an accurate time and tell you how far off the iPads internal clock is, it can’t fix the iPad’s clock (due to API restrictions). You’ll still need to make the adjust manually in the iPad’s Date & Time settings. Why the heck Apple can’t just have the iPad connect to the same Apple network time server it uses for the Mac is beyond me. Even if they didn’t do that couldn’t they at least adjust the clock when you sync it to iTunes? Seems like an area of iOS where Apple definitely needs to devote a little more time, eh?
Adam
While there are many UI changes in iTunes 10, a number of which are being debated on as to their merit. One in particular seems to be despised more than most. The change of the standard close, minimize, and maximize “signal” buttons from a horizontal orientation to a vertical one. We can only speculate why Apple’s engineers and designers made this radical change. The most obvious assumption is it better utilizes the extra vertical space created by the control buttons and the track info window. It also does provide consistency between the main player and mini player which already had the signal buttons in a vertical orientation.

One thing I believe users find frustrating about Apple making these kinds of changes is there often isn’t an option added to revert the item back to it’s old functionality or design. In the case of the iTunes 10 “signal” buttons, Apple truly does control the vertical and the horizontal. Or do they?
Take back the horizontal.
Smart Mac Geeks and hackers have found a way to put things back the way they were in iTunes 9 (nod to Macgasm for this trick). This hack does require entering some Terminal commands, so if that makes you nervous you probably want to skip it. For those of you who just can’t stand the new orientation and who are a bit more adventurous, this tip may be your solution. As a final warning, hacking around in the bowels of iTunes and your system always poses a risk. Please make sure you have back-ups and proceed with caution.
Put iTunes 10 “signal” buttons back in horizontal orientation
- Quit iTunes 10
- Launch the Terminal (Applications –> Utilities –> Terminal)
- At the prompt type the following:
defaults write com.apple.iTunes full-window -boolean YES
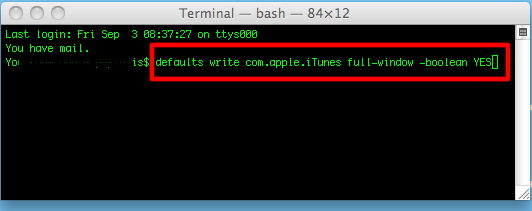
- Hit Enter (the change will be applied even though you’ll not get feedback).
- Quit the Terminal.
- Launch iTunes and enjoy your restored “signal” buttons. Ahhh!

If you decide later that Apple was right and vertical is better you can change things back by repeating the steps above and replacing the word ‘YES’ with ‘NO’ in step 3 like so:
defaults write com.apple.iTunes full-window -boolean NO
A friend of mine recently posted on Twitter an image like the one above. Very logically he posed this question… How does 3.65 + 0.35 = 3.75? Is this some strange new cult of Apple mathematics? There appeared to be missing 256MB of RAM. Concerned for my friend’s memory loss and a bit puzzled myself, I opened my Activity Monitor. You can see, I had exactly same result. Being the Mac geek that I am, I didn’t panic. I figured there had to be a logical explanation. Maybe this was like hard drives where they say 1 TB on the box, but in reality you get less. That happens because when marketing the hard drive they base the numbers on 1GB equaling 1,000 MB instead of the actual 1024MB that it should. In the case of my RAM that wasn’t it. So what gives?
A quick Google search revealed the logical answer. It’s something I should have realized immediately but didn’t. See, I have a newer 15″ Macbook Pro with an integrated NVIDIA 9400M GPU and it uses… You guessed it. 256MB of shared RAM.
Mystery solved.
Well, here’s a cool little trick I ran across while trying to find a way to hide the menu and scrollbars in Mac OS X. This one is a Terminal hack that you can perform in Mac OS X Snow Leopard to get folders in Quicklook preview to show up with transparent covers. This gives you an “x-ray” style view of the icons of items inside that folder. Pretty neat. Here’s a little video on how to do it along with step by step instructions after the break:
Step-by-step
1) Launch Terminal (Applications–>Utilities–>Terminal)
2) Type in the following command:
defaults write com.apple.finder QLEnableXRayFolders 1
3) Control+Option+Click the Finder icon in the dock and select ‘Relaunch’ to restart the Finder.
4) Select a folder in the Finder and press the spacebar to open it in Quicklook.
5) The folder icon should now have a transparent cover and you can see the icons of items inside the folder
Secrets – The GUI Method
1) Go to the Blacktree Site and download Secrets
2) Install Secrets. Double-click the .prefpane file and say OK when it asks if you want to install the Preference Pane.
3) Open System Preferences–>Secrets
4) In the ‘Top Secrets’ section check the box next to ‘Show X-ray folders in QuickLook’.
5) Click the ‘Quit This’ button to quit the Finder.
6) Click the Finder icon in the dock to relaunch the Finder.
7) Select a folder in the Finder and press the spacebar to open it in Quicklook.
8) The folder icon should now have a transparent cover and you can see the icons of items inside the folder
After mentioning on Twitter that Apple doesn’t support momentum scrolling on their new Bluetooth Magic Mouse under Leopard:
a helpful listener sent me a reply with this handy Terminal command to enable it.
defaults write com.apple.driver.AppleBluetoothMultitouch.mouse MouseMomentumScroll -bool true
After entering the command above into the Termial and hitting enter, simply turn Bluetooth off and then back on to update the setting. After that scroll away with full momentum in Leopard.
To change things back issue the same command, but rplacing the last word ‘true’ with ‘false’ and turn off and back on Bluetooth again.
iPhone 3.0 has brought some fantastic new features that are well known like Cut, Copy & Paste. However some smaller tweaks have been made to the operating system that provide a better user experience. To me most of these changes effect Podcasts. For example you now have easy access to the speed controls and a 30 second skip-back button incase you missed something. Fantastic for shows that go in-depth on specific topics like Security Now!

Also seen in the screenshot is the little envelope icon. This button allows you to share current podcast with a friend via an iTunes Link. This does not work on podcasts not featured in the iTunes store, so if you’re subscribed to an RSS feed you are unable to share.
The feature most important to me for daily use isn’t MMS, but the ability to quickly see the remaining battery life. My way around this was a little app called Free Memory, which has the auxiliary feature of telling you the battery life percentage. The app is still worth keeping around if you own an original iPhone or an iPhone 3G and for the ability to free some memory on your device. For iPhone 3GS owners, you now have a nice little option to show the battery life in the top tray of the iPhone.
To access the battery life option, head over to your settings button on the iPhone home screen. From there tap General, then tap Usage, and there will be a slider button on the top. This option is turned off by default and hidden in a screen most people never make there way into.

iPhone OS 3.0 has been great to me so far, but my big excitement is over the speed of the new 3GS which I was reluctant to pick up at first. A full review of my 16 GB 3GS White will be coming up soon. In the meantime, what features of the iPhone 3.0 update have proved useful to you?
Updated: Added text to help clarify that the battery percentage feature is an iPhone 3GS only feature. Thanks to the astute folks in the comments for pointing this out.


